Posts

Showing posts from May, 2025

Asymmetrical serving board

Image
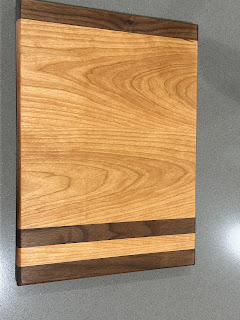
  What is your project? my project is a small serving board How did you make it? We cut many pieces of cherry and walnut ignorer to create our design What do you like most about your project? I like the non standard design of my board. Most people chose to create or use symmetrical cutting boards. I also like that I created a large chamfer on the Bottom edge to create a floating look. What was challenging about this project? it was challenging to decide what points to use so the grain would align nicely. What would you change about the project if you did it again? I would cut the chamfer to be on the other side. it looks fine but I think it could be better. What is your plan for it now that it's done? it will live in the kitchen and be used from time to time with guests.

Walnut, Cherry, And maple cutting board- Emma Rebuffini

Image
       My initial idea was to use all the different woods to make an ombre of sorts. We worked I'm pairs, so I designed mine with Camila, and we first started by planning it out and figuring out our design and the size. The measurements were really hard to figure out, but we eventually did it and cut our wood. We then glued it together and waited a week for it to dry. Then we cut it in 2, planed it, sanded it, and used the edge cutter to make the edges rounded. My mom's birthday was coming up, so I engraved Happy Birthday into my cutting board. In the next class, we added finishing oil and burnished it then took it home.  

Walnut, Cherry, Maple cutting board - Camila Ramirez-Iglesias - Design Tech

Image
  What is your project? Wooden cutting board How did you make it? Emma and I picked a pattern that we liked and cut the wood into different sizes and glued it together What do you like most about your project? It was fun getting to use new machines in the tinkeria What was challenging about this project? Figuring out what we wanted our cutting board to look like What would you change about the project if you did it again? Nothing What is your plan for it now that it's done? Use it in my kitchen

walnut and maple classic cutting board - Design Tech - Matteo Abel

Image
For this project in Design Tech, my partner Daniel and I created a striped hardwood cutting board using walnut and maple. Although I was out sick on the day we designed our projects, Daniel took the lead and came up with a design that I ended up really liking. It’s simple, balanced, and came out looking great. What is your project? Our project was to make a cutting board from strips of hardwood. We used walnut and maple, which contrast nicely in both color and texture. The design is a classic horizontal stripe pattern that looks professional and clean. How did you make it? First, we cut strips of walnut and maple to our desired thickness. We glued them all together to form one large board, and used clamps to hold everything tightly in place while it dried. I was honestly impressed by how strong the wood glue was everything held together really well. After the glue dried, we cut that large board in half to make two matching boards. Then we put our board through the planer machine to get...

City Map Coaster Set – Design Tech Project – Matteo Abel

Image
  What is your project? My project is a set of four wooden coasters, each engraved with a map of a city that’s meaningful to me: St. Louis, Missouri; Bari, Italy; Austin, Texas; and Rome, Italy. How did you make it? I started by designing each city map in Adobe Illustrator. After finalizing the designs, I imported them into the laser cutter to engrave and cut the coasters out of wood. I also designed a custom coaster holder in Illustrator and used the CNC router to cut it out. What do you like most about your project? What I liked most is how clean and personal the coasters turned out. I put a lot of effort into the designs, and seeing them come out just how I imagined felt really rewarding. The project looks sharp and meaningful. What was challenging about this project? The most challenging part was designing the city maps in Illustrator. It took a lot of time to get the details right and make sure they would engrave clearly on the wood. What would you change about the project if ...

Cutting Board - Design Tech Project

Image
My project is a cutting board, 9x12 inches, made from walnut and maple wood. I made the cutting board by cutting out four 1-inch pieces of wood (two for walnut, two for maple), one 2-inch piece of maple wood, and two 3-inch pieces of walnut. I glued these pieces together with wood glue and let them dry. After two days, I then chamfered the edges of the wood, followed by final sanding, application of finishing oil, and burnishing of the entire board. My favorite thing about my cutting board is the look of the wood after I applied finishing oil. The wood (especially the walnut) is a lot darker and looks much better than it did previously. The most challenging thing about my board was sanding the edges, as my sandpaper kept slipping out of my hand, and getting blown by the wind. The only thing I would change about this project is burnishing the sides of my coaster more thoroughly, as I can feel tiny imperfections around the edges. My plan for this cutting board is to give it to my mot...

Cutting Board- Design Tech Project

Image
What is your project? For this project, we made a Cutting board How did you make it? We first started planning on what design we wanted to do. Then we started measuring the dimensions of the wood. we had an option of choosing three different types of wood. i decided to use cherry and walnut wood. we cut the pieces into the length and width we wanted and glued them together. once the glue was dried we cut the board in half then we ran the wood through the thickness planer several times. after we used the table router to make the edges even. we sanded the board and applied varnish oil i let it dry and i put a second layer. and then it was all done. What do you like most about your project? i liked how the design turned out What was challenging about this project? the most challenging part was using the wood cutter. i found it difficult to use What would you change about the project if you did it again? i would make a more complex design next time What is your plan for it now that i...

Awesome cutting board for awesome food - Design Tech Project

Image
 Autumn's supa cutting board My project is an 11-by-7.5-inch cutting board made of cherry, walnut, and spruce wood. The design consists of a large stripe of cherry wood, followed by a medium stripe of walnut, another large cherry, a thin spruce line, and a final medium stripe of walnut. Alex and I worked together to draw the design, cut the strips of wood using the table saw, and glue them together.  After we let the glue dry for two days, we used the table saw to cut the strips of wood in half to make our individual cutting boards and remove any uneven pieces on the sides, and the planer to level the board to one thickness. The last day of this project was mostly using a table router to round off the edges and remove any chips on the corners and sanding (a bunchhhhhh of sanding). We used 120 grit to sand away any surface-level imperfections and any burn marks from cutting the cutting boards in half, then a 220 grit to make the wood super smooth and soft. Finally, I varnished ...

1. Title is [ Cutting Board: Summer Vibes] - Design Tech Project (Alexandria Richard )

Image
  1. Title is [ Cutting Board: Summer Vibes] - Design Tech Project (Alexandria Richard ) 2. Add a MINIMUM of two (2) photos of your cutting board. 3. Add "Design Tech" and "Cutting Board" as labels on your post. 4. Report about your project and reflect on the process by answering the following questions: What is your project?- For this design tech project, we focused on utilizing the wood cutting machines by creating a cutting board constructed of 3 different types of wood. How did you make it? To create our cutting board first, we measured out the dimensions of our wood and used the wood saw to cut out wood pieces to the desired length and width. Secondly, we glued our wood pieces together, clamped them together to dry until the next class. Finally, we used the wood planer to flatten and even out the wood and the router table to round out the edges. To finish up our cutting boards, we sanded them till smooth and varnished for a clean look.  What do you like most ab...

Flower coasters- Emma

Image
 My goal for this project was to create coasters that had laser-cut flowers on a light colored wood, and the coaster holder to be a darker color. For the coaster holder, I initially wanted to use cherry wood because it was dark but not too dark, but ended up using walnut because of the way it looked. For the coasters, I used maple, which is really light, so you could see the engravings on it really easily.  These were my inspiration pictures for the coasters and the coaster holder:                                                               My designs came out exactly what I was hoping they would and I really like the way that it came out.

Abstract Coasters- Design Tech Project

Image
My project was to make four coasters with an abstract design. I first started by looking for designs until i chose one and decided to do an abstract design on each of my coasters. I started working on my design in illustrator. I designed my coasters in illustrator and after i went ahead and used the laser cutter. My coasters turned out really well! after that i started working on my coaster holder i first designed it in illustrator and then i used the CNC router to cut it out. Then i did the final touches to my coasters by sanding them down and also the coster holder, after that i used a finishing oil. I really enjoyed this project because i learned how to use both the laser cutter and the CNC Router and i love how my costers turned out Something that was challenging about my project was getting the measurments right on the coaster holder. Also, when i was using the laser cutter i accidently clicked the line on one of the coaster designs so it turned red, that caused it to cut it i...

Fruit Coasters - Design Tech Prouject

Image
What is your project? Designing coasters on Adobe Illustrator How did you make it? I looked for ideas on Google and then created the shapes for my coasters on AI What do you like most about your project? I like that I painted them after they were finished and that they have color instead of being brown. What was challenging about this project? Figuring out how to get the exact shape I wanted on AI. What would you change about the project if you did it again? Use more time to get ideas for what I wanted my coasters to look like instead of choosing randomly. What is your plan for it now that it's done? Just have them in my house, use them, etc.

Houston Buildings Coasters - Design Tech Project

Image
For my coaster design project, I made coasters of 6 famous buildings in Houston (such as the Astrodome) in a skyline view with warped text below that says Houston out of maple wood. I made four coasters with the difference between them being the font and warp of the text at the bottom of the coaster.  To make my coaster I used the pen tool on Adobe Illustrator to outline famous buildings in Houston and used the grid tool to have the buildings look like they have windows. To get the warped effect on the text below the buildings, I used the envelope distort feature on Adobe Illustrator. After finishing the coaster design in Adobe Illustrator, I used the laser cutter to cut out my four coasters. I then sanded all sides of the coasters and applied finishing oil to them. I waited for about 5 minutes then burnished them and repeated the process.  The part of my coasters I like the most are the sanded edges. While it was difficult and took a lot of time to sand the edges of my coaste...

Kien: Family Guy Coasters - Design Tech Project

Image
  Family guy coasters My goal with this project was to develop a few creatively lighthearted designs for my house. I chose Family Guy as my theme because it is a well-known show that I am familiar with, and I knew it had iconic character designs that would be instantly recognizable to anyone who may see my coasters. For the most part, I enjoyed the creative freedom I was given with this project, many of the designs and creative liberties I drew by hand, and it's really cool to see those designs engraved in real life. The most challenging part of the project was figuring out the software that we were using, mainly Canvas and Adobe Illustrator, mostly because it was my first time using it. But aside from a couple of sizing issues, I'm happy with the way it turned out, and have a better idea of how to improve the next time. 

[ Jam Coaster ] - Design Tech Project(Alexandria Richard)

Image
  What is your project? For design tech, we constructed coasters and coaster holders. For my project, I designed coasters shaped like jam jars. Additionally, I built a coaster holder that looks like a wooden tray. I believe that this fits the theme and gives my project a spring vibe.  How did you make it? I started by sketching out the parts for my designs on a piece of paper and measuring out ratios for the proportions of my project. Secondly, I used Adobe Illustrator to re-create my designs on my computer, implementing the tech skills we have been learning. Using the laser cutter machine, I engraved wood with our designs and cut them into our desired shapes. Next, I used the CNC Router to cut out pockets in a thicker piece of wood for the parts of my wooden tray. And finally, we assembled everything with glue and sanded down our designs to a smooth and clean finish.  What do you like most about your project? My favorite part of the project was designing the coaster and ...

Sabacc Coasters - Design Tech Project

Image
My project was to make a set of coasters inspired by the fictional card game Sabacc from Star Wars. I really like the way the HDPE sheet creates some interest by having the alternate color appear as an island.