Posts

Showing posts from April, 2021

NFL Bandwagon Coasters - Design Tech Project

Image
                                         What is your project? My project is a set of walnut wood, 3-inch coasters featuring the logos of four different NFL teams surrounded by laurel wreaths. The symbols are those of the Houston Texans, New England Patriots, Tampa Bay Buccaneers, and Seattle Seahawks. The holder is also made out of walnut wood. How did you make it? I used Adobe Illustrator to design the logos and coaster holders. After using various programs to finish up my blueprints, I used the laser cutter to engrave the logos and cut out the coasters. As for the holder, I cut out five separate parts to assemble with glue. I sanded all the pieces, then covered a linseed oil finish on both and let it dry for a couple of days.          What do you like most about your project? The simplistic design of the ‘victory’ laurels behind my favorite NFL teams, I would say. The coasters also fit perfectly in the holder and enable easy access.       What was challenging about this project? Mos
Illustrator coaster designs (4) - Design Tech

Image
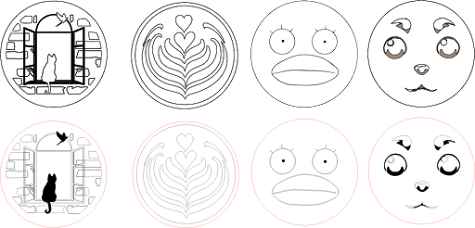
apologies for the low quality graphics  What is your project? My project is a set of coasters with different engravings on each, paired with a simple looking coaster holder. I was planning to cut the coasters out on light-colored wood, like cherry wood, and the coaster holder from a darker wood, preferably walnut.  How did you make it? I started by gathering ideas and inspiration from the internet and hand-drawing potential designs. Once I had a general plan I started working with illustrator. I found images that I could put together and edit to make my design as well as creating shapes and lines in the program. I didn't get to cut out my project because I'm a student online, so the extent of my project ends here.  What do you like most about your project? I liked having the authority to make creative decisions and seeing the "final" product actually look like what I'd envisioned it to be.  What was challenging about this project? A big challenge for me was creati

Rose Coasters- Design Tech Project

  What is your project? This is my coaster set and coaster holder. The coaster holder is made out of Purpleheart wood. The coasters are made out of Maple and Purpleheart wood inlay. How did you make it? I made the coasters on the laser cutter. I started by cutting the maple part to hold the purpleheart rose. I proceeded to cut the purpleheart roses, I had to flip the image of the rose so that I could combine the two types of wood. Once the two parts of my coaster were finished I had to hammer the two together. Once the pieces were together I used the power sander. After this, I printed my coaster holder with a CNC Router (Carvey) in two pieces and I glued them together. Once the glue dried I used the power sander on my coaster holder. Once all of my project was sanded I used a mixture of linseed oil and beeswax to seal the wood and bring out the beautiful color of the maple and purpleheart.  What do you like most about your project? The thing that I like most about my project is the wa

Sports-Themed Engraved Coaster Set - Design Tech Project

Image
.        What is your project? I created a coaster set with a coaster holder from walnut wood. How did you make it? I initially had to create the design on Adobe Illustrator, which probably took the longest of any portion of this project. Afterwards, I got to print my designs. With the coasters, they were laser cut. The coaster holder was created with a CNC router, aptly named the “Carvey.” It was printed in two pieces, which were glued together. The difference between these two methods is important. The laser cutter works best on engraving. The only issue is that it does leave char marks on the wood, as seen on the side of my coasters. The “Carvey” works well with thicker materials and for deep cuts, evidenced by the coaster holder, with the deeper cuts and the creation of that pocket for the coasters. After everything was printed, the sanding came. This was likely the second longest portion of the project and the one that was equivalent to arm day. The final touch was to put two la

Wooden Butterfly Coaster- Design Tech Project

Image
Wooden Butterfly Coaster What is your project?  My project consists of 4 wooden coasters and a coaster holder. My project is made out of cherry wood and has an intricate design of butterflies in a field.  How did you make it? I started the process off with designing the butterfly design in Adobe Illustrator. I then transferred the design into the laser cutter. Once the design was cut onto all four of the coasters, I began to sand them down. This made the wood much smoother and made it easier to apply a finishing oil to the wood. The finishing oil, which consisted of linseed and beeswax. The finishing oil helps protect the wood from water damage and scratches. Once I was finished with the coasters I began the process of designing a coaster holder. I put my designs into Easel, a proprietary online software that transferred the designs into the CNC Router. This took a slab of wood and cut out a box-like shape. I then cut and sanded down all of the rough edges using a tool called a random

Spiderweb Coaster and Coaster Holder - Design Tech Project

Image
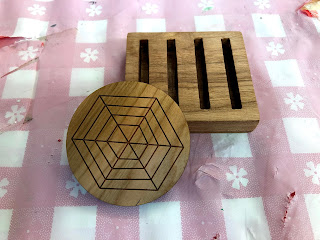
What is your project? My project is a set of coasters with spider-web designs on them and a coaster holder to accompany them. They are both made of walnut wood. How did you make it? I used the laser cutter to make the coaster and it's design. I also used the CNC Router to make my coaster holder. After that, I proceeded to sand them down using a random orbital sander and sandpaper. Finally, I used linseed oil to make the features on the coaster and coaster design stand out more. What do you like most about your project? I am quite proud of the spider-web design on the coasters. It took me a while to figure out how to create that design on Illustrator and I'm happy it turned out well. What was challenging about the project? Once again, designing the spider-web design was quite a challenge. Another area where I struggled a little was finding the right measurements for my coaster and coaster holders so that the coasters could fit in the coaster holders. What would you change about

Geometric Octagon Coasters

Image
           . What is your project? For my project, I made a set of 4 octagon coasters and a coaster holder. The coasters are made out of purple heart, with an engraved design. My coaster holder is made out of walnut wood.  How did you make it? First I had to design my coasters on Adobe Illustrator. After figuring out what shape and what designs I wanted on my coasters, I started working on my coaster holder. They were scaled designs, so the holder was designed to be .1 inches wider, in order to leave room for the coasters. After They were completely designed, I used the CNC Router to cut out my coaster holder. Originally I had two pieces because my coasters were going to be much bigger. However that did not work out, so I only used half of my holder. After I was done with my holder, I used the Laser Printer to cut out my coasters. After everything was cut out, I sanded it down with 150-400 grit sandpaper. After it was completely sanded, I used a finishing oil made out of linseed oil an

Acrylic Beverage Coasters - Design Tech Project

Image
For my design tech project, I created 5 coasters and an accompanying coaster holder. Everything is made from clear acrylic, and the coasters are adorned with engravings of the Post Oak Bearkat paw.  I made the coaster using Adobe Illustrator to create the design and a laser cutter to engrave and cut out the coasters. The coasters are 3.5 inches in diameter and a quarter of an inch thick. Firstly, I created circles and found the design of the Bearkat paw. The background of the coaster is filled with topographic lines. I designed the coaster holder in pieces on Adobe Illustrator, and after cutting it out with the laser cutter, I used acrylic cement to bond the pieces together.  I like the see-through aspects of the coasters the most because it feels unique and kind of futuristic. I also really like how the coaster holder allows the coasters to stand on their sides.  The most challenging aspect of the project for me was designing and assembling the coaster holder. It took me a rough draft

Geometric Dog Coasters

Image
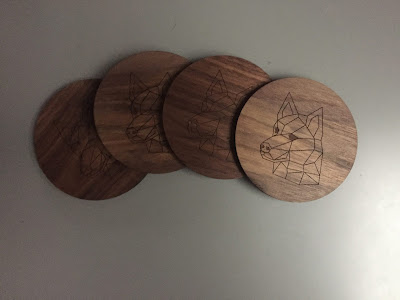
 This is my coaster project. They are made out of walnut wood and they have an engraving of one of my dogs - my husky - on them.  First, I created my coaster design on Adobe Illustrator and I created my coaster holder design on Easel. Unfortunately, I did not have time to carve out the coaster holder because I was not in person until the last couple weeks, but at least I was able to print out the coasters. After the coasters were printed out, I sanded them down, starting with 150 grit, then moving to 220 grit and finally 320 grit. Once the coasters were smooth enough, I finished them with linseed oil, letting them dry for a couple days after I was done.  My favorite part of this project was designing the engraving and how well it actually came out. The final product also feel really nice and smooth.  I would say that the biggest challenge I faced while making this project was being online for the majority of the time we had to complete it and having to catch up with the others once I c

Zodiac Sign Coasters-Design Tech Project

Image
What is your project? My project for Design Tech is zodiac-themed coasters! I made one for each member of my family, with their sun sign. How did you make it? I started my process by making a design from scratch on adobe illustrator. I added the zodiac name, symbol, and star alignment on each of the coasters, along with some stars in the back to match the galaxy theme. After my design was completed, I transferred it over to be cut in the Laser Cutter. I cut my design out on maple wood, then I made my holder design. I went for a fairly simple design, so it doesn't take the spotlight away from the coasters. After all of my parts were cut out, I sanded them all down in preparation for finishing oil. I did my first layer of finishing oil, then I burnished it (with steel wool), and kept doing this process for another 2 layers. This project took many hours of hard work, but I am very pleased with the results.  What do you like most about your project? I like how my project is completely

SAMPLE: Geometric Hexagon Coasters with Epoxy Inlays - Design Tech Project

Image
What is your project? This is my coaster set and coaster holder. They are both made out of walnut wood, and the coasters also have black epoxy resin for the inlays. How did you make it? I made the coasters on the laser cutter and then filled in the gaps with epoxy that I had dyed black. The coaster holder was cut out on the CNC Router (Carvey) in two pieces and then glued together. Once everything was glued and dried I did a lot of sanding with a random orbital sander, sandpaper, and Dremel sanding disc. I finished all of the pieces with a mixture of linseed oil and beeswax to seal the wood and bring out the beautiful color of the walnut. I also attached some thin cork on the bottom so they have a little more grip on the table. What do you like most about your project? I like that the final product looks like something you would buy, and also that each of the coasters have their own unique design. I like that the coaster holder looks like it is made out of one piece of wood, even thoug